At a party this past weekend, friends kept saying "I've been reading your blog..." (of course I was thrilled they kept up with the blog) and in the same breath out comes "but I haven't seen any updates in awhile." Alright, I get it. Subtle hints to my slacker-ness.
I thought about updating the blog when I got home that night but I didn't. In my defense, we've lost our camera with the latest renovation pics. It's somewhere in the house. Not all that surprising considering the chaos we've been living in.
And then today, I get this on gchat.
Lisa: i need more blog
me: huh? need more blog?
Lisa: i need you to blog. i have checked at least 4 times
Ok. A not so subtle hint about my slacking.
This one's for you, Lisa.
Until I can find my camera with the latest pics, I thought I'd share the fun stuff (i.e. not the sweaty, cursing, whining parts of the renovation).
When we started designing our kitchen renovation, we focused more on the functionality of it. Most importantly, we needed more efficient storage solutions and a counter top that could handle our everyday use and resist stains. We had settled on pouring our own concrete counter tops because my brother wanted to give them a try. So the counters became the focal point of my inspiration for the aesthetic design of the kitchen.
I am going to say "I" throughout this post because generally that's how Jon and I work when it comes to design/decor. I come up with something I like and then I just run it by him to see if he's cool with it. Usually, he likes it but he definitely doesn't hold back if he doesn't like it. Don't let him fool you into thinking that I don't give him a chance to put in his two cents. Of course, if I really like it and he doesn't, I have veto power over him. We work hard at keeping our marriage 60/40.
I wanted to keep the cabinet color white to reflect the little natural light that we have coming into the kitchen by way of the small window above the sink and the door to the patio.
Next, the back splash. This was my first choice. It's from Lowe's. I really like that it picked up the color of the cabinets in the marble pieces, the counter tops in the dark gray pieces, and a subtle hint of color in the light blue pieces. By the way, that's a sample of our concrete counter tops that my brother, Phu, poured. The counters will look darker than that because we will polish, wax, and seal them. That sample is just straight up concrete.
I'm a very visual person. I was dead set on this back splash for about a month. Then I saw this picture on Houzz.com. It's a similar back splash in that it has long narrow pieces of various types of stone and color. After seeing this picture I was worried my first choice would be too busy because of the pattern and the fact that our kitchen is not as open and airy as this kitchen.
Back to the drawing board. I considered white subway tile but thought that might be too plain. I searched online and in magazines for inspiration. I kept going back to white marble. It's gorgeous. One day, I hope to have a beautiful slab of carrera marble somewhere in my house. It's not as plain as subway tile because it has gray veining throughout which would pick up the color of our concrete counters a bit. A slab of marble for a back splash is definitely way out of our budget.
So I went back to Lowe's. I kept going back to Lowe's because I have coupons to use there. I also found that Lowe's has a much bigger selection of tile than Home Depot but mostly it was all about the coupons. Lowe's came through! I found this awesome marble mosaic back splash for a price that's easier on our budget.
I love the stark contrast of the white against the dark gray concrete but there is still some interest to the tile due to the light gray veining throughout. Don't mind that green spot on the tile. It's just a reflection of the green tank top I was wearing when I took the picture.
We had already purchased stainless steel cup pulls and knobs for the hardware. We found a really good deal on them online so we just went with it. All of our appliances are stainless steel, as well as our sink, so we figured it'd look fine.
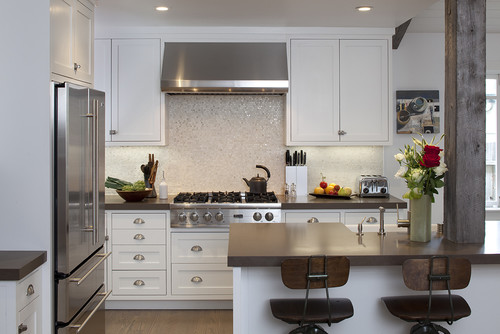
One day I was checking out photos of kitchens on Houzz and I came across this one. I loved it instantly and then realized THAT is our kitchen. Well, kind of. It's really similar. The white cabinets, the gray concrete counters, the cup pulls for the drawers, and the white back splash (minus the sparkles).
Like I said, I'm a very visual person. I had all the fragmented pieces of our kitchen design in my head but I couldn't picture how it would all look together. This image did it for me. It is how I want our kitchen to be. It's very calming and neutral. It also gave me some inspiration for stools for our island. I like how the wood from the stools adds some warmth and the overall industrial feel of the kitchen. So with this inspiration in my head, we've decided on three of these stools and two of these pendant lights to hang over our island.
image: World Market
image: Sundance
And that is our kitchen design to date. Or at least we hope. Shoot, anything better than what it looks like now is a step in the right direction.